
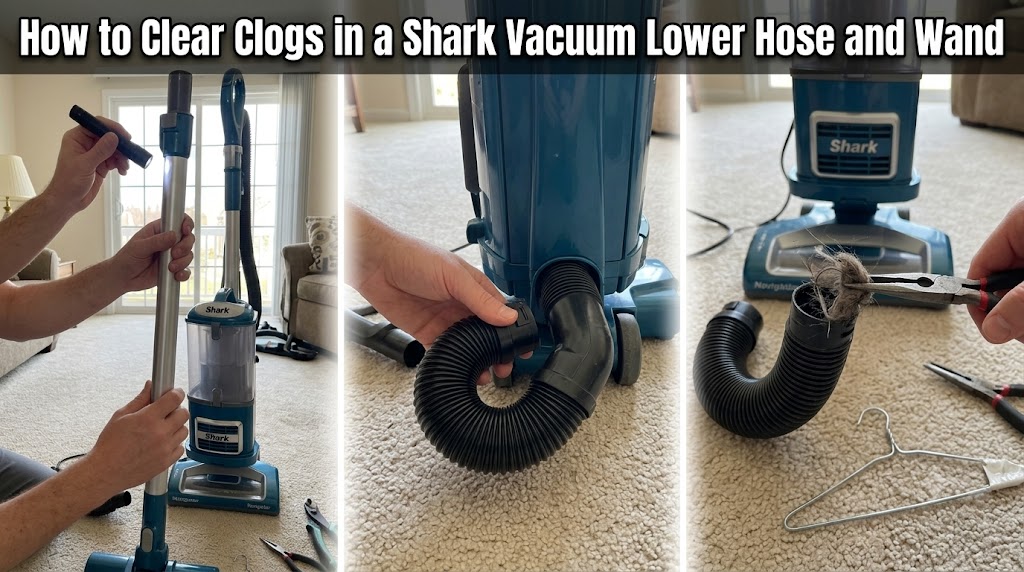
A clogged Shark vacuum hose or wand can cause weak pickup, but an empty dust cup does not automatically mean the blockage is in the lower duct. Hair, paper, fabric, and other debris can obstruct the floor nozzle, lower hose, extension wand, stretch hose, or filters.
The fastest way to find the problem is to disconnect power, inspect each accessible airflow passage, and clear visible debris without damaging rubber hoses, plastic tubes, or electrical contacts.
This guide covers safe checks for corded and cordless Shark vacuums. Access panels, release mechanisms, electrical connections, and indicator lights vary by model, so check your owner’s guide before removing covers or internal parts.
Quick Answer: How to Clear a Shark Vacuum Lower Hose or Wand
To clear a Shark vacuum lower hose or wand, disconnect power, inspect the airflow path with a flashlight, and remove accessible debris using a suitable blunt tool.
- Disconnect power. Unplug a corded vacuum. On a cordless model, switch it off and remove the battery if the design and owner’s guide permit.
- Empty the dust cup. This prevents collected debris from spilling when you reposition the vacuum.
- Inspect the wand. Detach it and shine an LED flashlight through both ends to check for visible obstructions.
- Check the floor nozzle and lower duct. Look for wrapped hair, paper, plastic, and other debris around the intake and accessible hose openings.
- Remove the blockage carefully. Use pliers for an accessible object or a smooth, blunt plastic cleaning tool for a soft plug. Do not force a tool around a bend.
- Inspect for damage. Check the hose ribs, joints, seals, and wand connectors for tears, cracks, or looseness.
- Reassemble and test. Refit each part securely, following the model’s instructions, before restoring power.
If the vacuum has shut off because of overheating, do not restart it immediately. Unplug it, remove accessible blockages, check the filters, and follow the cooldown time specified in the owner’s guide.
| Component | Function | Possible blockage or fault | What to inspect |
|---|---|---|---|
| Floor nozzle | Collects debris from the floor | Hair, string, paper, or debris near the intake | Brushroll area, intake opening, and nozzle passage |
| Lower duct hose | Carries debris-laden air away from the floor nozzle | Hair or a foreign object caught in a curved passage | Accessible openings, rubber ribs, joints, and seals |
| Extension wand | Connects the floor nozzle to the upper airflow path | Paper, fabric, or compacted debris inside the tube | Both ends and the visible interior |
| Stretch hose | Provides a flexible airflow path | Debris caught near a cuff or bend | Hose openings, cuffs, and visible damage |
| Dust cup and cyclone | Collects debris and separates it from the airflow | Full dust cup or accumulated debris | Fill line, cup inlet, and accessible cyclone surfaces |
| Filters | Capture particles from the airflow | Dirty or damp filters restricting airflow | Filter condition and the cleaning instructions for the model |
A blockage can occur in more than one location. Check the airflow path systematically rather than assuming that the lower hose or wand is responsible.
1. Why the Lower Duct Hose Can Become Blocked
The lower duct hose connects the floor-nozzle area to the vacuum’s upper airflow path. On models with a flexible, ribbed section near the swivel neck, debris can catch around a bend or opening.
Long objects such as sticks, hair clips, or pieces of plastic may lodge across a narrow passage. Hair, lint, and carpet fibers can then accumulate around the obstruction.
Look for these signs:
- Visible hair or foreign material around the nozzle intake or an accessible hose opening.
- Debris that remains in the floor-nozzle passage after the brushroll area is cleaned.
- Tears, punctures, or splits along the rubber hose ribs.
- A loose connection between the hose and its rigid collar.
- A sharp, persistent whistle or hiss that may indicate an air leak.
- Weak pickup that continues after the dust cup and filters have been checked.
Do not diagnose a clog by motor sound alone. A change in pitch can accompany restricted airflow, but sound does not reliably identify the exact location. A hiss can also indicate a leak rather than an obstruction.
Check the lower duct without damaging it
Switch off and disconnect the vacuum before inspection. Position the floor nozzle so you can safely examine its accessible openings, keeping your face away from the underside in case loose grit falls out.
Use an LED flashlight to inspect the nozzle intake and any visible passage. If the curved hose prevents a direct view, inspect from each accessible opening rather than forcing a tool through the bend.
Do not remove a cover, clip, or screw unless the instructions for your exact model identify it as a user-accessible part.
2. Why the Extension Wand Can Lose Airflow
The extension wand connects the floor nozzle to the handle or upper hose. Depending on the model, it may be a simple hollow tube or part of a system that carries electrical connections to a motorized attachment.
Paper, fabric, hair, and other debris can lodge inside the tube or near a connector where the passage narrows. Inspect both ends before assuming the blockage is in the middle.
Use the LED sightline check
- Switch off and disconnect the vacuum.
- Detach the wand using its designated release mechanism.
- Remove any attachments from the ends.
- Shine a bright LED flashlight into one end while looking through the other.
- Rotate the wand slowly and inspect the visible interior.
A clear view through the tube helps confirm that the central passage is open. If the beam is blocked, look for debris before attempting to remove it. Internal contours and connector features can partially obstruct the view on some models, so a blocked sightline alone does not prove that the wand is clogged.
Do not drop coins, marbles, or metal weights into the wand. These objects can become lodged and may damage the tube or connector contacts.
Safety note for powered wands
If the wand has electrical contacts or wiring, keep it dry. Do not immerse it or run water through it unless the owner’s guide explicitly permits that cleaning method. Moisture around electrical connections can damage the equipment.
3. Step-by-Step: How to Clear the Lower Duct Hose
Step 1: Disconnect power and empty the dust cup
Unplug the corded vacuum from the wall. For a cordless model, switch it off and remove the battery if the design allows it and the owner’s guide instructs you to do so.
Remove and empty the dust cup according to the manufacturer’s instructions. This reduces the chance of spilling collected dirt when you reposition the vacuum.
Step 2: Find the approved access point
Place the floor nozzle on a stable, padded surface. Check the owner’s guide for the correct way to access the lower duct and nozzle passage.
- Do not assume every Navigator uses the same clip or turn-lock arrangement.
- Do not assume every Rotator, Apex, or Vertex has release tabs in the same location.
- If the cover does not release easily, stop and check the instructions for the exact model.
- Do not pry plastic housing with a screwdriver or force a recessed fastener.
Some blockages can be removed through an existing opening without taking off a panel. Use the least invasive method available.
Step 3: Remove visible debris
Shine a flashlight into the accessible passage. If an object is clearly visible and easy to reach, use suitable pliers to grip it and withdraw it carefully.
For a soft hair or lint plug, a smooth, blunt plastic cleaning tool may help loosen the material. Work gently from an accessible opening. Do not force a tool around a tight bend or push a rigid object deeper into the duct.
Avoid wire coat hangers, knives, screwdrivers, and other sharp tools. They can puncture a flexible hose or scratch and damage internal components.
If the blockage cannot be reached without force, stop and consult the model’s service instructions or contact Shark support.
Step 4: Inspect the hose and its connections
With power disconnected, gently flex the accessible rubber section while inspecting it under a flashlight.
Look for:
- Splits or punctures in the ribbed hose.
- A cracked plastic collar or swivel connection.
- Rubber separating from the rigid connector.
- A section that remains visibly crushed or distorted.
- A loose joint or damaged seal.
A damaged hose can cause suction loss even after the obstruction is removed. Replace a split or cracked component with a compatible part rather than relying on tape as a permanent repair.
Step 5: Reassemble the lower duct
Refit only the parts you removed, following the model-specific instructions. Make sure the hose is seated correctly and that each accessible latch or cover is secure.
Listen and feel for the normal engagement of the connection, but do not assume every Shark model uses the same click or locking mechanism. A poorly seated joint can allow air to escape and reduce pickup.
4. Step-by-Step: How to Clear an Extension Wand
Step 1: Identify the wand type
Check the connector ends and owner’s guide to determine whether the wand is a simple hollow tube or contains electrical connections.
Do not assume that all wands from a particular Shark product family share the same design.
Step 2: Clear a standard hollow wand
For a non-powered, hollow wand, first try to remove loose debris by hand from the accessible opening. If an obstruction is visible but out of reach, use a smooth, blunt cleaning tool that fits comfortably inside the tube.
Work from the end that gives the clearest and safest access. Apply gentle pressure only. Stop if the tool catches on an internal feature or the debris refuses to move.
Do not force a thick dowel through the tube. An oversized tool can wedge against the blockage or damage the wand.
Step 3: Clear a powered wand
For a wand with electrical contacts or internal wiring, use dry methods only unless the owner’s guide specifically states otherwise.
Remove accessible debris carefully without bending connector pins. Avoid inserting metal tools near electrical contacts. If material is jammed inside a section you cannot reach safely, stop rather than forcing it through.
Step 4: Check the passage again
After removing the debris, shine a flashlight through the wand once more. Check for remaining paper, plastic film, hair, or fabric caught against the inner wall.
Inspect the release buttons and connectors for visible damage. Reattach the wand only after it is clean and dry, and confirm that the connection is secure according to the model’s instructions.
5. Shark Vacuum Diagnostic Matrix: Noise and Symptoms
| Symptom or sound | Possible cause | What to check next |
|---|---|---|
| Motor pitch changes and pickup is weak | Restricted airflow, a full dust cup, or dirty filters | Empty the cup; check the filters, wand, hoses, and nozzle |
| Suction drops when using the wand | Wand obstruction, loose connection, or hose blockage | Inspect the wand and check that the connectors are properly seated |
| Persistent whistling or hissing | Possible air leak at a hose, joint, or seal | Inspect the rubber ribs, collars, and connections for damage |
| Brushroll turns but debris remains | Blocked intake, lower duct, brushroll area, or another airflow restriction | Disconnect power and inspect the nozzle and accessible air passages |
| Solid red brushroll or headlight indicator on an equipped model | Shark’s general upright guidance associates this with a jam in the brushroll area | Turn off and unplug the vacuum, then clear debris from the nozzle |
| Flashing red brushroll or headlight indicator on an equipped model | Shark’s general upright guidance associates this with an overheated motorized floor nozzle | Turn off and unplug the vacuum, check for blockages, and follow the model’s cooldown instructions |
| Vacuum shuts off unexpectedly | Possible overheating, blockage, power issue, or another fault | Disconnect power, inspect for blockages, and consult the owner’s guide |
| Grinding or rattling from the nozzle | Possible hard debris or a mechanical issue | Stop operation and inspect the nozzle and brushroll area |
The red-light descriptions above follow Shark’s official upright-vacuum maintenance guidance. They are not a universal diagnostic code for every Shark vacuum. Indicator availability and meaning depend on the model.
If the vacuum has no brushroll indicator, do not use the presence or absence of a light to diagnose the problem. Check the owner’s guide for the correct troubleshooting procedure.
6. What to Do if the Shark Vacuum Shuts Off from Overheating
Some Shark vacuums have a motor-protective thermostat that switches the machine off when it overheats. Restricted airflow is one possible cause, but an unexpected shutdown does not prove that the lower hose is clogged.
Follow these steps:
- Turn off and unplug the vacuum. For a cordless model, switch it off and follow the battery-removal instructions in the owner’s guide.
- Check the airflow path. Inspect the nozzle, lower duct, wand, stretch hose, dust cup, and other accessible passages for blockages.
- Check the filters. Clean them only as directed for your model, and make sure they are completely dry before reinstalling.
- Allow the vacuum to cool. Shark’s general upright guidance says to wait 60 minutes for affected models. Some cordless instructions specify a different period, including 45 minutes for certain models. Follow the instructions for your exact model.
- Restart only after the checks are complete. If the vacuum shuts off again, stop using it and contact Shark support or a qualified repair service.
Unplugging the vacuum is an important safety step before inspecting or clearing it. Do not treat 45–60 minutes as a universal reset specification for every Shark model.
For additional guidance, consult Shark’s official upright-vacuum maintenance and troubleshooting page.
7. Filter Maintenance and Drying Rules
A clear hose will not restore normal airflow if the filters remain clogged. Check the filter-cleaning instructions for your exact model before washing any filter.
For models whose instructions permit rinsing the pre-motor or HEPA filters:
- Rinse with cold water only if that is what the model’s instructions specify.
- Do not use soap or detergent unless the manufacturer explicitly permits it.
- Allow the filters to air-dry completely for at least 24 hours, or longer if they remain damp.
- Do not reinstall damp filters.
- Do not use a hair dryer, radiator, or other artificial heat source to speed up drying.
- Reinstall the filters in the correct positions and orientation.
Shark’s official upright maintenance guidance instructs users to dry washed filters completely for 24 hours before reinstalling them. Filter types and cleaning procedures can differ, so check the owner’s guide before rinsing any component.
If the filters are clean and dry but suction remains weak, continue checking the remaining airflow path rather than repeatedly washing them.
8. When to Replace the Lower Hose or Wand
Cleaning may not solve the problem if a component is physically damaged. Consider a compatible replacement or professional service if you find:
- A split, torn, or punctured rubber hose.
- A cracked swivel neck or connector.
- A joint that cannot seat securely.
- Bent, scorched, or damaged electrical contacts.
- A dented or deformed wand that prevents a secure connection.
- A persistent air leak after the connections have been correctly reseated.
Before ordering a replacement, locate the model number on the vacuum’s rating label. A part that fits one Shark model may not fit another, even if the machines look similar.
If the part is not clearly identified as user-replaceable in the owner’s guide, contact Shark support before dismantling the housing.
Frequently Asked Questions
Why does my Shark vacuum have weak suction even when the dust cup is empty?
An empty dust cup does not rule out a blockage. Check the filters, floor nozzle, lower duct, wand, stretch hose, and connections. A damaged hose or a loose joint can also reduce suction.
How can I tell if the Shark wand is clogged?
Detach the wand with the vacuum switched off and disconnected from power. Shine a flashlight through both ends. If the interior view is obstructed, inspect for debris, bearing in mind that internal connector features can partly block the light.
Can I wash a Shark vacuum wand?
Do not assume every wand can be washed. Standard hollow tubes and powered wands may have different cleaning requirements. If a wand has electrical contacts or wiring, keep it dry unless the owner’s guide explicitly permits washing.
What does a red brushroll light mean on a Shark vacuum?
Shark’s general upright guidance associates a solid red brushroll or headlight indicator with a jam in the brushroll area, and a flashing red indicator with an overheated motorized floor nozzle. These meanings apply to equipped models covered by that guidance; check your model’s owner’s guide for confirmation.
How long should I wait before restarting an overheated Shark vacuum?
Follow the cooldown instructions for the exact model. Shark’s general upright guidance specifies 60 minutes for affected models, while some cordless model instructions specify 45 minutes. Disconnect power, clear accessible blockages, and check the filters before attempting to restart.
Final Verdict
The safest way to clear a Shark vacuum lower hose or wand is to isolate the airflow path, inspect accessible openings with a flashlight, and remove visible debris without forcing tools through narrow or curved passages.
If suction remains weak, check the filters and connections, then inspect the hose for physical damage. Do not assume every Shark model uses the same access panel, indicator lights, or cooldown period. The model number and its owner’s guide are the best way to confirm the correct procedure.